
Configuring NGINX as a Reverse Proxy: A Comprehensive Guide
As a powerful web server and reverse proxy, NGINX is widely used to enhance the performance, security, and scalability of web applications. In this blog post, we’ll delve into the world of NGINX as a reverse proxy, exploring its unique features, configuration options, and best practices.
How Traffic Routing is Handled in NGINX as a Reverse Proxy
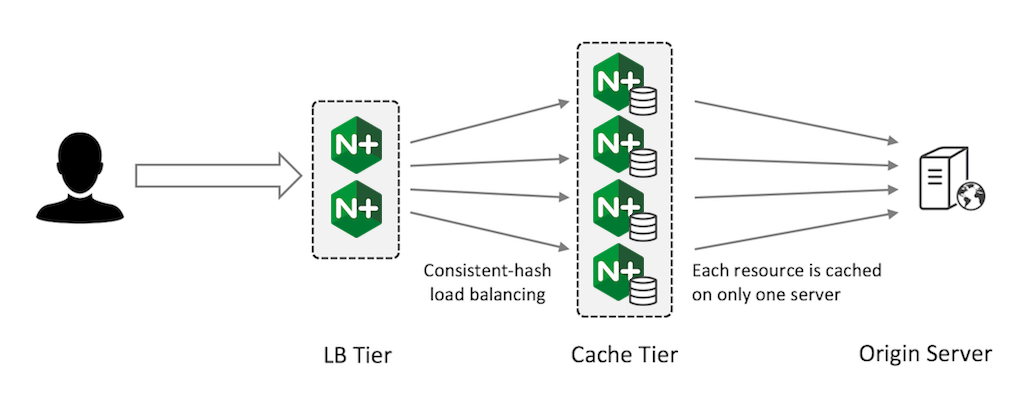
In a traditional request-response cycle, a client (e.g., a web browser) sends a request to a server, which processes the request and returns a response. As a reverse proxy, NGINX sits between the client and the server, intercepting requests and forwarding them to the actual server. This allows NGINX to cache responses, compress data, and apply security measures like SSL encryption.
What’s Unique to NGINX as a Reverse Proxy?
NGINX’s reverse proxy capabilities are unparalleled, thanks to its:
- Caching: NGINX can cache frequently requested resources, reducing the load on the origin server and improving response times.
- Load Balancing: NGINX can distribute traffic across multiple servers, ensuring high availability and scalability.
- SSL Termination: NGINX can terminate SSL/TLS encryption at the edge, offloading this responsibility from the origin server.
Configuring Encryption
To configure encryption with NGINX as a reverse proxy:
- Enable SSL/TLS: Add
ssl onto yourhttpblock in your NGINX configuration file. - Specify Certificate Files: Include the path to your SSL/TLS certificate files (e.g.,
ssl_certificate /path/to/cert.crt; ssl_certificate_key /path/to/key.pem;). - Configure Cipher Suites: Specify allowed cipher suites using
ssl_ciphers.
Manipulating Headers
NGINX provides two directives for modifying headers: proxy_set_header and add_header.
- proxy_set_header: Sets the value of a header in proxied requests. Example:
proxy_set_header X-Forwarded-For $remote_addr; - add_header: Adds a new header or updates an existing one. Example:
add_header X-Custom-Header "Hello World";
Demonstrating Header Manipulation
To demonstrate header manipulation:
- Create an
nginx.conffile:
http {
    ...
    upstream backend {
        server localhost:8080;
    }

    server {
        listen 80;
        location / {
            proxy_pass http://backend;
            proxy_set_header X-Forwarded-For $remote_addr;
            add_header X-Custom-Header "Hello World";
        }
    }
}- Start NGINX and access your website; verify that the headers are correctly set.
Modifying or Tuning Memory Zone Configuration
NGINX’s memory zone configuration allows you to fine-tune memory allocation for different zones (e.g., worker processes). To modify or tune memory zone configuration:
- Create a custom memory zone: Add a new
zonedirective in yourhttpblock (e.g.,zone my_zone 32m;). - Assign zones to worker processes: Use the
zonedirective in yourworker_processesblock (e.g.,worker_processes 4; zone my_zone 32m;).
Configuring NGINX as a Socket Reserve Proxy
To configure NGINX as a socket reserve proxy:
- Create an upstream block: Define an upstream group of servers (e.g.,
upstream backend { server localhost:8080; }). - Set the proxy_pass directive: Configure the upstream group as the target for proxied requests (e.g.,
location / { proxy_pass http://backend; }).
Handling Health Checks with Open Source NGINX
Open source NGINX provides built-in support for health checks through the health_check module. To configure health checks:
- Enable the health_check module: Add
http/modules/ngx_http_health_check_module.soto yournginx.conffile. - Define health check locations: Specify URLs that should be checked for healthiness (e.g.,
/health-check). - Configure check intervals and timeouts: Use the
health_check_interval,health_check_timeout, andhealth_check_max_failsdirectives.
By mastering these concepts and configuration options, you’ll be well-equipped to leverage NGINX’s powerful reverse proxy capabilities in your own projects.
Here are some more Nginx configuration examples:
1. Redirecting HTTP to HTTPS
To redirect all HTTP requests to HTTPS, add the following configuration:
http {
    ...
    server {
        listen 80;
        server_name example.com;
        return 301 https://$server_name$request_uri;
    }

    server {
        listen 443 ssl;
        server_name example.com;
        ...
    }
}
2. Enabling Compression
To enable compression for responses, add the following configuration:
http {
    ...
    gzip on;
    gzip_min_length 1000;
    gzip_proxied any;
    gzip_types text/plain text/css application/json application/xml application/javascript;
}
3. Caching
To enable caching for static resources, add the following configuration:
http {
    ...
    http {
        proxy_cache_path /path/to/cache levels=1:2 keys_zone=cache:10m inactive=30d;
        proxy_cache_valid 200 302 120m;
        proxy_cache_valid 404 1h;

        location /static/ {
            proxy_pass http://backend;
            proxy_cache cache;
            expires 30d;
        }
    }
}
4. Load Balancing
To set up load balancing across multiple servers, add the following configuration:
http {
    ...
    upstream backend {
        server localhost:8080 weight=3;
        server localhost:8081 weight=1;
        server localhost:8082 weight=2 backup;
    }

    server {
        listen 80;
        server_name example.com;

        location / {
            proxy_pass http://backend;
            proxy_set_header Host $host;
            proxy_set_header X-Real-IP $remote_addr;
        }
    }
}
5. Rate Limiting
To limit the number of requests per minute, add the following configuration:
http {
    ...
    limit_req_zone $binary_remote_addr zone=one:10m rate=10r/m;

    server {
        listen 80;
        server_name example.com;

        location / {
            limit_req one burst=5 nodelay;

            proxy_pass http://backend;
            proxy_set_header Host $host;
            proxy_set_header X-Real-IP $remote_addr;
        }
    }
}
6. SSL/TLS Configuration
To configure SSL/TLS certificates, add the following configuration:
http {
    ...
    ssl_certificate /path/to/cert.pem;
    ssl_certificate_key /path/to/key.pem;

    server {
        listen 443 ssl default_server;
        server_name example.com;

        ...
    }
}
7. Error Pages
To customize error pages, add the following configuration:
http {
    ...
    error_page 404 /404.html;

    server {
        listen 80;
        server_name example.com;

        location / {
            root /var/www/html;

            error_page 404 = @error_404;

            location @error_404 {
                return 404 @error_404.html;
            }
        }
    }
}
Conclusion
NGINX is an incredibly versatile web server and reverse proxy that offers numerous benefits, including caching, load balancing, and SSL termination. By understanding how traffic routing is handled in NGINX as a reverse proxy, you can unlock its full potential and enhance the performance, security, and scalability of your web applications.
Happy configuring!
