

Unlock Faster Page Loads: A Step-by-Step Guide to Configuring HTTP/2 on Apache
Introduction:
In today’s fast-paced digital landscape, website speed is crucial for providing a seamless user experience. Slow page loads can lead to high bounce rates, low engagement, and even negatively impact your search engine rankings. One way to boost your website’s performance is by enabling HTTP/2, the latest version of the HTTP protocol. In this post, we’ll walk you through the process of configuring HTTP/2 on Apache, the popular open-source web server software.
What is HTTP/2?
HTTP/2 is the successor to HTTP/1.1, designed to improve the performance and efficiency of web communication. It introduces several key features, including:
- Multiplexing: Multiple requests and responses can be sent over a single connection, reducing overhead and improving resource utilization.
- Binary framing: Headers and data are encoded in binary format, making them more compact and efficient to transmit.
- Header compression: Duplicate headers are eliminated, reducing the amount of data sent over the wire.
- Server push: Servers can proactively send resources to clients, reducing the number of requests needed.
Why Configure HTTP/2 on Apache?
Enabling HTTP/2 on Apache can bring several benefits to your website, including:
- Faster page loads: By reducing the number of requests and improving resource utilization, HTTP/2 can significantly speed up page loads.
- Improved user experience: Faster page loads lead to higher engagement, lower bounce rates, and increased conversions.
- Better search engine optimization: Google and other search engines favor fast-loading websites, which can improve your search engine rankings.
Configuring HTTP/2 on Apache: A Step-by-Step Guide
To configure HTTP/2 on Apache, follow these steps:
Step 1: Check Your Apache Version
HTTP/2 is supported in Apache 2.4.17 and later versions. Check your Apache version by running the following command:
apache2 -vStep 2: Enable the HTTP/2 Module
Enable the HTTP/2 module by running the following command:
- Install php-fpm package:
 sudo apt-get install php8.1-fpm
 sudo a2dismod php8.1
sudo a2enconf php8.1-fpm- Enable the proxy_fcgi module:
sudo a2enmod proxy_fcgi- Enable some additional apache2 modules that are needed:
 sudo a2dismod mpm_prefork
 sudo a2enmod mpm_even
 sudo a2enmod ssl
 sudo a2enmod http2
Step 3: Restart Apache
- Restart Apache to apply the changes:
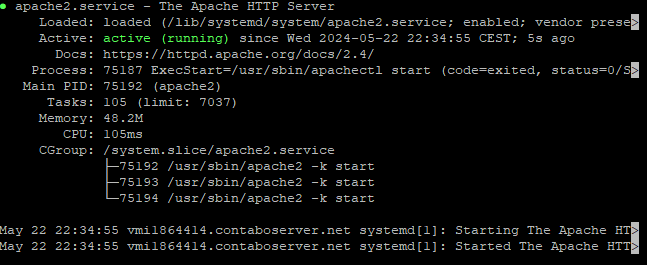
sudo systemctl restart apache2- Verify Apache is still active and running using the systemctl status command.
systemctl status apache2
- The output of this command in order to be successful should look like the following:
Step 4: Update Your Apache Configuration File
Update your Apache configuration file (usually apache2.conf or httpd.conf) to include the following lines:
The following command will help you locate the file
 cd /etc/apache2
 grep -r Protocols .
The output should look something like this in the terminal:
./mods-available/http2.conf: Protocols h2 h2c http/1.1
The first line enables HTTP/2 and specifies the protocols to use. The second line enables direct HTTP/2 connections.
Step 5: Verify HTTP/2 Support
Use tools like curl or a web browser to verify that HTTP/2 is enabled:
curl -I -k --http2 https://example.comLook for the HTTP/2 response header to confirm that HTTP/2 is working.
The output should look like the following :

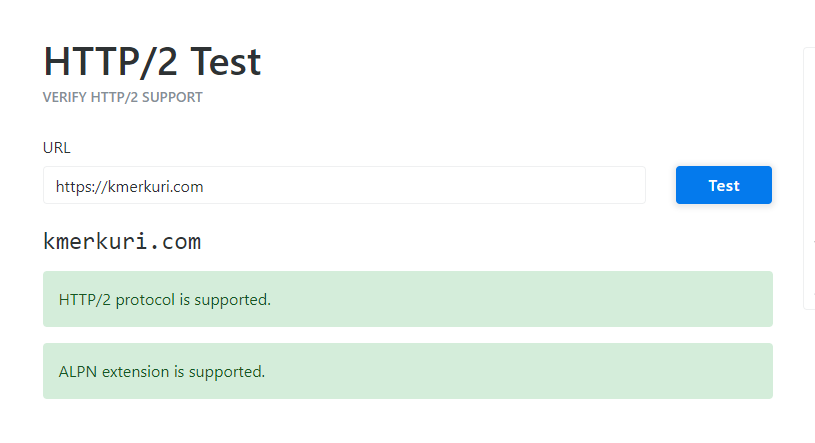
Alternatively you can use this site
Results should look like this
Conclusion:
Configuring HTTP/2 on Apache is a straightforward process that can significantly improve your website’s performance. By following these steps, you can unlock faster page loads, improve user experience, and boost your search engine rankings. Remember to test your website thoroughly after enabling HTTP/2 to ensure that everything is working as expected. Happy optimizing!
